Washer Settings
These settings are stored for your currently selected Connection design method.
- General Overview
- Tips and Tricks
- Related Tools
Washer thicknesses: The thicknesses of the available washer types. Values can range from 1/16 inch to 3-0 feet (2 mm to 914 mm). Washer thicknesses are used to calculate Bolt stick-through.
Material Plate Washers: This button opens the Material Plate Washers Settings screen.
Material plate washers are made of rectangular plate, unless the length and width of the washer created when bolts are generated for connection designed connections matches the size of a flat bar entry on the Preferred Flat Bar Sizes list, in which case they are made of flat bar material. You can create submaterial details of these washers. Washers that ship loose are created as one or more legacy miscellaneous members.
Connection design method: This tells you what the Connection design method is currently set to. The list of bolt types and their settings are stored for the specific connection design method you have selected.
Bolt types: A selection list of the available bolt types for your currently selected Connection design method. Changes made to the washer settings for a selected bolt type apply to that bolt type only. Each bolt type may be assigned a different set of washers for shop bolting or field bolting through various hole types.
Tip: Each bolt type that is listed is defined in the Bolt Specifications. If you add a new bolt type to the Bolt Specifications screen, then re-open this screen, the new bolt type you just added will be listed on this screen.
Shop bolts: Under the heading Shop Bolts, assign washers to bolts for fastening structural members and their submaterials together in the shop. Shop bolts are drawn on member details.
Field bolts: Under the heading Field Bolts, assign washers to bolts for fastening structural members together at the construction site. Unlike shop bolts, field bolts are not drawn on member details.
Hole Type: Washer types are set by Hole Type (Standard, Short slot, Long slot, or Oversized).

![]() hole types
hole types
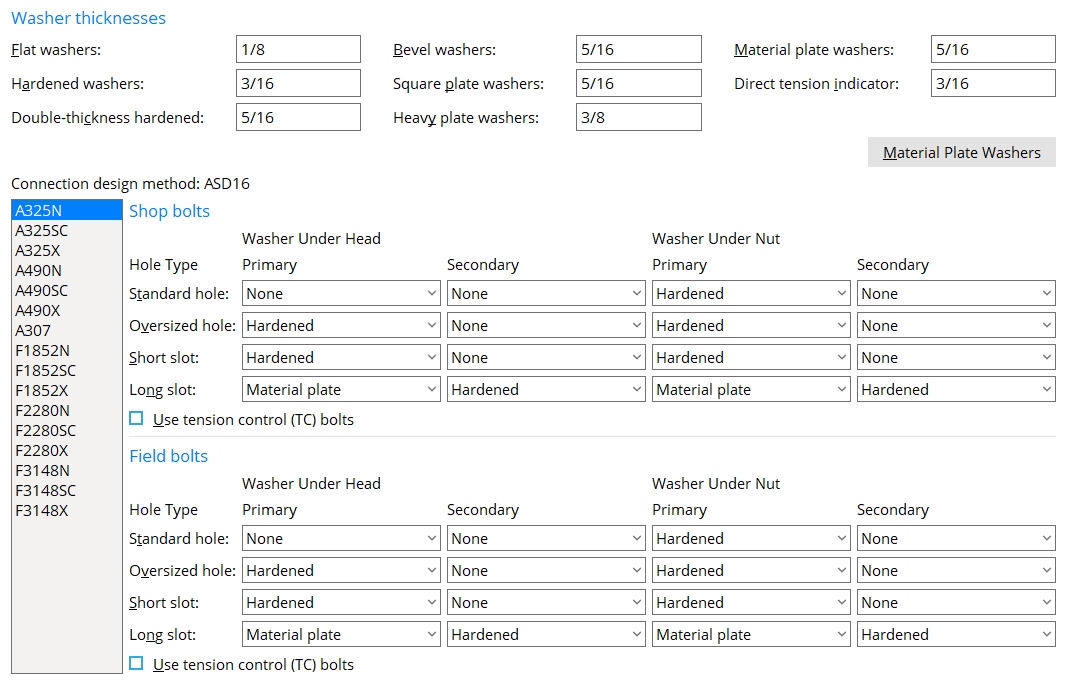
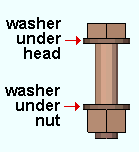
Washer Under Head, Washer Under Nut: Types of Washers Under Head are defined separately from types of Washers Under Nut of the bolt.
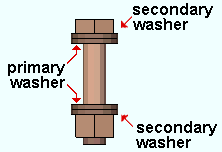
Primary, Secondary: The Primary position is the position closest to the steel being fastened. The Secondary position is the position closest to the head/nut. One, two or no washers may be placed under the head and/or under the nut.
For one washer, select a type under the Primary position only.
For two washers, select a type under both Primary and Secondary position.
For no washers, select None for both the Primary and Secondary positions.
Types of washers: None or Flat or Hardened or Double thick hardened or Bevel or Square plate or Heavy plate or Direct tension indicator or Round plate or Material plate.
| Flat (FL) |
Hardened (HD) |
Bevel (BVL) |
Square
plate (PL) |
Direct tension indicator (DTI) |
Round
plate (RPL) |
|
|
|
|
|
|
|
| Double thick hardened (DTHD) and Heavy plate (HVPL) washers are used for A490 bolts that are greater than 1 inch in diameter when they are applied to slots or oversized holes -- this is not set up here, but is done automatically. | |||||
You'll find all but Material plate washers listed in the Remarks column of the bill of material and in various shop and field bolt reports. Material plate washers, unlike the other washers shown above, are listed as submaterials and not in the Remarks column when they are set to be shipped With Member.
If you are using Material plate washers for a particular situation (bolt type, etc.) that is specified on this screen, then the choices made on the Material Plate Washer screen apply to that situation.
Use tension control (TC) bolts:  or
or  . A TC bolt is a bolt with a splined end extending beyond the threaded portion of the bolt. The bolt is installed using a special wrench that removes the splined end when the bolt is tightened to the proper tension.
If this box is checked (
If this box is not checked (


|
|
OK (or the Enter key) closes this screen and applies the settings.
Cancel (or the Esc key) closes this screen without saving any changes.
Reset undoes all changes made to this screen since you first opened it. The screen remains open.
- Double thick hardened and Heavy plate washers are used for A490 bolts that are greater than 1 inch in diameter when they are applied to slots or oversized holes -- only their thicknesses are set up here, the rest is done automatically.
- When a Bolt type is selected for a particular connection, particular types of washers are automatically associated with the grade of bolt and hole type. Also, different washers may be appropriate depending on whether or not the bolt is to be fastened in the shop or in the field.
- For instance, for one bolt type you may want two washers of the same type and thickness, one washer for the head and the other washer to go under the nut, except when that bolt goes into a slot, in which case you want two different types of washers under the head (the stronger washer to go in the primary position, closest to the steel) and two different types of washers under the nut (again, the stronger washer to go in the primary position).
- Please note that if you have made changes to this screen and want to ensure design consistency throughout the Job, you should interactively mark for processing (or Process Selected) all members in your current Job, then Process and Create Solids.
- Red or yellow exclamation point icons
 or
or 
- Process & Create Solids (selections here applied during)
- Bolt Specifications (sets bolt types listed on this screen)
- Field Bolts reports (list washers associated with field bolts)
- Shop Bolt reports (list washers associated with shop bolts)
- Add washers to prevent shank-out when needed (adds more washers)
- Remarks (column in bill of material that notes washer type, etc.)

